It’s the first Friday of the month, so it’s time for our new challenge at the Creative Artiste Challenge Blog, which as always is Anything Mixed Media Goes.
I had fun creating this springtime mixed media page as it seems that spring is on its way with all the daffodils and blossoms flowering at the moment.
I started this page by embossing the background using a Fragments stamp set by Tim Holtz, a VersaMark Watercolour stamp pad and some bronze embossing powder. Then I covered the page with Brushed Bronze Distress Paint and when dry, I applied some black metallic wax and Salvaged Patina Distress Paint to create some contrast. Next I arranged lots of ephemera and stickers by Simple Stories, Kaisercraft and Tim Holtz. Then to finish, I splattered the page with white and black acrylic paints and the Salvaged Patina Distress Paint.
For more inspiration please check out the amazing creations from our Guest Designer and my fellow Design Team members over at Creative Artiste too. All you need to do is to use three different mediums on your projects to join our mixed media challenge; I hope you are inspired to join us, it would be lovely to see you there!
These are the daffodils flowering in our garden at the moment, which I seem to think don’t normally appear until March. Do you think that spring flowers seems to flowering early this year?
Stay safe and well! x
Thanks for joining me today! If you have any questions or comments, I would love to hear from you.
Today I’m over at Country View Challenges for this month’s Christmas Anything Goes challenge with my Christmas Wishes art journal page.
The collage background was created using lots of Christmas Ephemera from Tim Holtz; they were stuck in place using Liquitex matte gel medium. When dry, I applied some Pébéo white gesso over the top using a baby wipe and then I painted a thick layer of gesso around the edge of the page. I applied a layer of Ranger Texture Paste over the edge of the page too, using a palette knife, to make it look like icy snow. The candles and foliage were die cut from Tim Holtz Kraft papers using a Candlelight and also a Festive Bouquet Thinlits set by Tim Holtz. I added more colour and shimmer to the die cut pieces using some Craf-T Lustre waxes and they were edged using Vintage Photo Distress Archival Ink. Before sticking the candles in place, I applied some of the Lustre wax to create the candle’s glow and I also splattered the page with white gesso. To finish, I added the “Christmas Wishes” wording which was from a Tim Holtz Christmas Sticker Book.
I hope you are inspired to join our Christmas Anything Goes challenge over at Country View Challenges too, if you do, you’ll have two chances to win a £20 voucher to use on the Country View Crafts (grin!).
I love Christmas and here’s a beautifully embroidered mat, that adorned our festive table whilst visiting family recently – wishing you a Safe and Merry Christmas and all the best for the New Year! x
Thanks for joining me today! If you have any questions or comments, I would love to hear from you.
For the sake of brevity I am no longer listing the individual items that I used to create my page, however I’m more than happy to let you know which particular product was used if you contact me via comments below or using the following contact me link. You can find most of the products that I used over at Country View Crafts too.
Challenges
As well as Country View Challenges, I’m pleased to be able to join the following challenges today:
Paperbabe Stamps and their Challenge #158 – Anything Goes with my Christmas Wishes page.
It’s a new month so we are launching our July challenge today over at the Creative Artiste Challenge Blog, this is a monthly challenge and as always the theme is Anything Mixed Media Goes.
I always love to use mixed media to create my art journal pages and this month’s celebrates summer.
I started by sticking the orchid flower napkin pieces onto the page using a glue stick. Then I coloured the remaining white areas of the page using some Gold, Light Green and Hooker’s Green Liquitex acrylic paint. When dry, I used a Flutter stamp from Kaisercraft to add the trellis pattern using Cottage Ivy and Pistachio Memento Inks and also black Archival Ink. I outlined and defined the flowers using a black fine line marker and I added the two dragonflies which were rub on transfers. I applied some Glistening Gold Lustre Polish by Cosmic Shimmer around the edges of the napkin which added some lovely texture and sparkle. Finally, I splattered the page with some black and also some white acrylic paint using a paintbrush. Then I added the wording which are stickers from Kaisercraft; they read “be happy”, “be you” and “celebrate the little things”.
All you need to do is to use three different mediums on your projects to join our Anything Mixed Media Goes Challenge. For more inspiration please check out the amazing creations from my fellow Design Team members over at Creative Artiste too. I hope you are inspired to join us; it would be lovely to see you there!
This page reminded me of these amazing orchids that we saw hanging in a garden centre some time ago; so beautiful (grin!).
I hope that you’re all staying safe and well! x
Thanks for joining me today! If you have any questions or comments, I would love to hear from you.
Here is a list of all the materials used to create this art journal page:
Orchid Napkin
Pritt Stick
Liquitex Basic Acrylic Color (Gold, Light Green, Hooker’s Green Hue Permanent)
Kaisercraft Clear Stamps (Flutter CS853)
Tsukineko Memento Ink (Cotage Ivy, Pistachio)
Ranger Archival Ink (Jet Black)
Uni Pin Fine Line Marker (Black 0.05mm)
Royal & Langnickel Rub-On Transfers (ROY1643G)
Cosmic Shimmer Lustre Polish (Glistening Gold)
DecoArt Crafter’s Acrylic (Black)
Art Discount Acrylic (White)
Kaisercraft Sticker Sheet (Say Aloha SS281)
Challenges
As well as Creative Artiste, I’m pleased to be able to join the following challenges today:
Art Journal Journey which is being hosted this month by the lovely Alison from Words & Pictures; she has chosen Summer Countryside as her theme so I’m joining with my summer inspired page and the green and gold colours and pretty dragonflies that you find in the countryside.
Paperbabe Stamps and their Challenge #147 – Anything Goes with my mini art journal page.
LTSCB #147 – Anything Goes over at Love to Scrap Challenge Blog with my summer inspired mixed media page which includes stamping.
As you may remember, I was surprised that I had never featured The Singing Ringing Tree before on one of my posts. We visited this sculpture a couple of years ago for my birthday, so it inspired this page – I hope you like it (grin!).
I started by adding the image of The Singing Ringing Tree, which was from an old magazine, using a glue stick; it was edged with a Cold Grey Faber-Castell Big Brush marker. I coloured the white areas of the page by stamping a Steampunk Background stamp and the “Explore, Discover, Journey” wording using Hickory Smoke Distress Archival Ink and adding some Hickory Smoke and Salty Ocean Distress Ink. The letters were die cut using Alphanumeric Bold Thinlits set by Tim Holtz and were cut from some silver corrugated cardstock. I covered the letters using Silver Grey lustre wax and black Faber-Castell Big Brush marker to give it a grungy metallic appearance. Before sticking them in place I added some Pébéo white gesso over the stamped areas to push the colour back and then I stuck the letters down using Liquitex matte gel medium. I outlined the right-hand side of the letters using a black Uni Pin marker so they stood out more and then to finish, I added three metal music notes using Ranger Glossy Accents.
Reminded of our visit, I also found some of our photos to share with you (grin!). The singing ringing tree is located a little way from the road so we parked and then walked to the sculpture; Panopticon means “structure providing a comprehensive view”.
It was a short trek to The Singing Ringing Tree which is a wind powered sound sculpture resembling a tree and set in the landscape of the Pennine Hill range overlooking Burnley in Lancashire.
This 3-metre (10 ft) tall sculpture was designed by architects Mike Tonkin and Anna Liu of Tonkin Liu and has amazing views across the Pennine Moors.
It comprises of galvanised steel pipes; some are structural and others are cut across their width to produce sound by harnessing the energy of the wind.
It was a windy day when we visited so we got to hear the haunting sounds of The Singing Ringing Tree, if you are interested to hear the sounds and see more of the view please check out this video.
As T Stands for Tuesday, I’m sharing a photo that you may remember of me with my cup of green tea and a Chorley cake which was actually bought the same day that we visited this sculpture – Happy T Day!
You can find out more about Chorley Cakes which are a sweet treat here in Lancashire on my previous post Use Your Scraps; the title of this post also reminded me to wish Elizabeth a very Happy bEARTHday for later this week!
I hope that you’re staying safe and well. x
Thanks for joining me today! If you have any questions or comments, I would love to hear from you.
Here is a list of all the materials used to create this art journal page:
Old magazine image
Pritt Stick
Faber-Castell Big Brush Pitt artist pen (Cold Grey IV 233, Black 199)
Tim Holtz Distress Ink (Hickory Smoke, Salty Ocean)
I’m pleased to be able to join the following challenges today which are:
Art Journal Journey where the theme is Inspired By in honour of Eileen from The Artful Crafter’s Blog who picked the theme and was supposed to host this month but sadly passed away shortly after her heart surgery last month – she is greatly missed! I’m so pleased to be able to remember her by joining AJJ with my page which was inspired by The Singing Ringing Tree.
I hope you’ll join us, please check out the rules here.
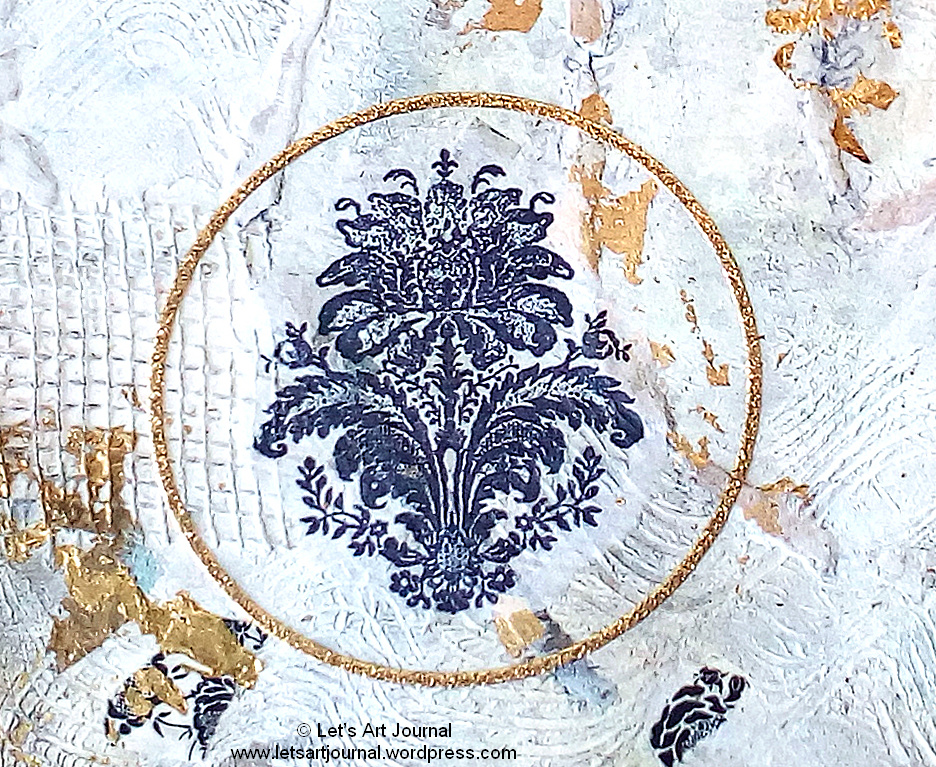
My art journal page was inspired by Arundel which we visit every winter whilst staying with family. My grungy background showcases the golden crown fountain located at Arundel Castle as well as some beautiful postage stamps from my hubby’s childhood stamp collection that I thought matched the design beautifully (grin!).
To create my grungy background, I started by covering a Sea Green inky background with a thick layer of white gesso and then collaging some odd bits of paper that were on my craft desk to add texture. Then I applied some Pébéo modelling paste to the page and scored it using a small ice scraper to create the waves and lines of texture. Next I added some drywall tape and then I covered everything with another layer of white gesso. When dry, I rubbed on some Midnight Sparkle and Amber lustre wax with my finger to emphasise the textures that I’d created. I added some ripped pieces of black and white washi tape and some postage stamps that I had stamped using gold acrylic; they were leftover from another page. Then I applied lots of gold leaf using gold size to adhere it to the page; applying it so it gave a grungy look.
Next I stamped some Adornment shapes from Papermania onto some tissue paper using black Archival Ink and stuck them in place using Liquitex matte gel medium. When dry I framed each of them with a gold circle using Glitterations stickers. I fussy cut the image of the crown fountain from a leaflet about Arundel castle, mounted it onto some recycled card and stuck it to the page using double-sided tape.
To finish the page, I added two beautiful postage stamps which are from Hungary dated 1970 and picture Gold Artefacts; my hubby kindly gave me his childhood stamp collection to use for my art journaling (grin!).
I hope that you are inspired to join our Anything Mixed Media Goes Challenge too! For more inspiration please check out the amazing creations from my fellow Design Team members over at Creative Artiste too.
Here’s the crown fountain which is part of the gardens of Arundel Castle and as you can see from this video the crown revolves being supported by a jet of water; it was based on a 17th century classical design by English architect Inigo Jones.
As we visit Arundel during the winter months the castle and gardens aren’t open so I’ve never seen this magical fountain but we always admire the view of the castle whilst on our walk around Arundel.
We walk by the castle walls and then into woodland.
Then down by the river, as you can see we had lovely blue skies too.
Which leads us back to the castle again, as you can see the river water levels are really high from all the rain we’ve been having here. From the castle we head into the town to look around the pretty shops and have a spot of lunch (grin!).
Thanks for joining me today! If you have any questions or comments, I would love to hear from you.
Challenges
I’m pleased to join the lovely Eileen from The Artful Crafter and her Green challenge over at Art Journal Journey this month with the pop of green on my neutral background from the green postage stamp on this page.
I’m also happy to join the Anything Goes challenge over at Paperbabe Stamps with my page too.
Here is a list of all the materials used to create this art journal page:
Today I’m joining the Something New challenge that I’m hosting this month over at Art Journal Journey with a new technique using a hot glue gun that I’ve wanted to try for a while. Here’s the journal page that I created, what do you think?
Whilst the glue gun was heating up, I doodled an abstract heart design onto the page using a pencil.
Once the glue gun was heated to temperature, I applied the hot glue over the pencil marks and also added some dots of glue and then I left the glue to cool and dry.
I then applied Aged Ivory Stampendous embossing enamel powder over the top of the glue by carefully heating the surface of the glue up again with my heat gun (it takes seconds) and then covering it with the embossing enamel powder; it’s important that you don’t heat the glue too much as it will flatten and loose its 3D shape. I left the glue to dry and harden again before I carefully heated it again using the heat gun to melt the embossing enamel. Next I painted the page using Kuretake watercolour paints; using Red for the hearts and for the rest of the page using Rose Madder and Colbalt Violet coloured paints.
When dry, I coloured the embossed hot glue with a glittery gold lustre polish (which was new to my craft stash) using a paintbrush. The words are rub-on transfers from Tim Holtz and read “Love”, “Love you to the moon & back”, “always & forever” and “better together”. To finish, I splattered the page using some black DecoArt acrylic paint.
As Valentine’s is approaching, my winter window display, like my page, gets a smattering of red hearts which provides a lovely contrast to the white decorations (grin!).
As T Stands for Tuesday, I’m sharing a pint of Lancaster Red beer which we enjoyed at one of our favourite pubs – cheers and wishing you all much love this T day!
Challenges
I’m pleased to join the Love challenge over at Country View Challenges with my Love art journal page.
I’m joining in the All Loved Up challenge over at Simon Says Stamp Monday Challenge as with my love and hearts designed art journal page.
Over at the Mix It Up Challenge Blog their theme is # 33 – Anything Goes + optional twist of Paper Piecing, so I’m pleased to be able to join this challenge too.
Thanks for joining me today! If you have any questions or comments, I would love to hear from you.
Here is a list of all the materials used to create this art journal page:
Bostik Hot Glue Pen & Glue
Stampendous Embossing Enamel (Aged Ivory)
Kuretake Gansai Tambi Japanese Watercolour Paint set (Red No. 32, Rose Madder No. 34, Rose Madder Deep No. 36, Colbalt Violet No. 139)